








How I Set Up My Bullet Journal for a New Year
/
One of my favourite myths about artists is that they’re disorganized. In television and movies, all kinds of artists are often portrayed as scatterbrained, all-over-the-place “creative types” – music or paint or scripts scattered everywhere, late for everything, head in the clouds. I will admit that I know a few artists that are like this; it’s just who they are as people. But the vast majority of artists, especially really high-calibre, high-achieving ones, are EXTREMELY organized. I mean, way more organized than the average person.
A lot of artists kick organization’s ass because they have to. The majority of art forms are time-bound and time-consuming by nature. Take, for example, an opera singer landing a new role she will debut exactly one year from now, with 400-pages of extremely difficult music in German that she will need to learn, master, interpret musically, and memorize before that first rehearsal. Or a painter with a gallery show in six months for which he will need to conceptualize, plan, and physically create a cohesive collection, possibly starting completely from scratch. Add to these long-term projects (of which the artist will often have many on the go at a time) the fact that most artists have a myriad of daily commitments (from teaching to commercial work to both artistic and non-artistic side hustles) and you’ve got people who need to be on top of their scheduling game 24/7.
Frankly, the organizational aspect was my favourite part of being a singer. Figuring out how to prepare for a big performance is basically project management 101. Daily scheduling (of practice, rehearsals, work, coaching, exercise, etc.) is essential for success. Which is why I credit my time as an artist, and not my time as a lawyer or working in the corporate world, for (to toot my own horn) my organizational prowess. But, my time in law school, a rigorous MBA program, and at a law firm and a big corporation all helped me hone my abilities and natural inclinations to be a lean, mean, organizational machine.
And this, my friends, brings me to my favourite time-crafting tool: the bullet journal.
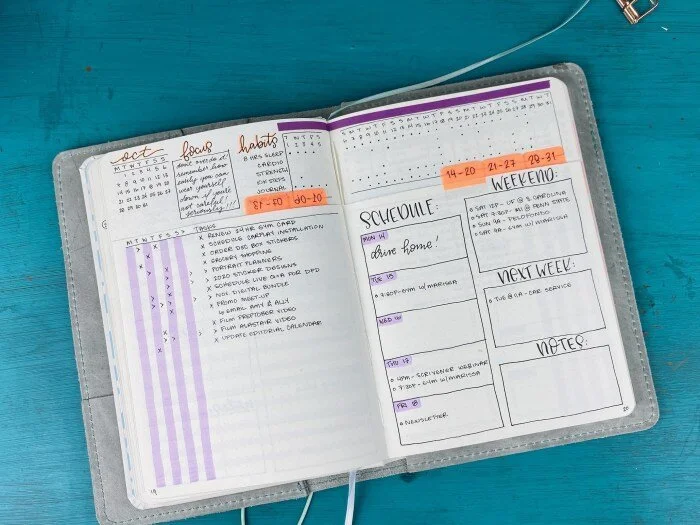
Mmm… bullet journal-y goodness
Here from bullet journal legend, Kara Benz, aka @bohoberry.
I’ve always loved day planners. From those super simple ones you get in high school to the schedule-every-minute-of-every-day ones I filled up in college, I can’t get enough. I’ve always enjoyed being busy (even if that means being busy with projects and obligations I’ve constructed for myself), and being able to plan my time physically and visually has always mattered a great deal to me.
When I got out of school (for the last time – lol) and went into my corporate job, all of my scheduling moved from my day planner to good ol’ Outlook, which was a super weird shift. A lot of artists use analog methods (or super simple “let me throw this in my calendar on my phone”-type methods), so landing somewhere where everyone used an intense, linked calendar system was… disorienting. It was clunky. It was ugly. I needed to figure out a way to integrate it with the shared Apple/Google calendar Ryan and I share without clogging it up (it was pretty jammed to begin with).
Add to this the fact that, while I actually really loved that job, it wasn’t the most… expressive or creative function I’ve ever worked in. So I was always looking for little ways to add more artsiness, fun, and creativity into my days.
So thank the good lord that I found bullet journaling, which solved literally all of these problems. For those unfamiliar, the bullet journal is the invention of Ryder Carroll, and it’s basically a calendar/journal system. At its purest roots (Carroll is a minimalist, and the original system has zero artistic/illustrative elements – see his video below), a bullet journal is a system through which you manage all of your commitments, projects, and to-dos. It’s a way of taking a blank journal and turning it into the most functional day planner you’ll ever use.
People loved Carroll’s creation so much that they basically ran in all different directions with it – in particular, designing original, beautiful “spreads” for everything from weekly planning to budgeting to gardening to… well, anything you can think of, really. Thus, if you search “bullet journal” on Google images or, in particular, Pinterest, you end up with a lot of very overwhelming, super intensely designed, illustrated, hand-lettered pages that seem awfully hard to recreate.
After going through several bullet journals now myself, I’ve settled on a style that’s somewhere between Carroll’s original stark and simple approach and the more florid, flowery versions you find on Pinterest. I like that I can add in colour and doodles and cool page layouts, but the whole point of the “BuJo” is that it works, so I always try to keep function as my focus.
As I write this, the new year is just a few days away, which is the ideal time to set up a new bullet journal. I’ve converted quite a few people to the system over the past few years (from finance nerds to super artsy friends), so I hope you’ll give it a try as well if it sounds appealing. Just remember: there is no wrong way to bullet journal. The whole key is to experiment until you figure out your ideal methods. So with that said, let’s dive in!
GETTING SET UP TO BULLET JOURNAL
If you search for a list of supplies you need for a bullet journal, you are 100% going to end up with someone’s blog full of Amazon affiliate links – and, hence, they’re going to try to tell you that you need 50 gazillion supplies to bujo. Let me tell you this: you probably don’t need to buy anything for your first bullet journal.
My first bullet journal was one of those super thin Moleskine notebooks that come in three-packs (because I had one in my desk drawer). I used a Sharpie pen for most of it (I still do – they’re my favourite), and for colour, I used whatever generic brand neon highlighters my office supply room had. That’s it.
If you’re just starting out, I would recommend that you keep it simple. You do NOT need anything fancy to bujo – in fact, one of my most devoted “bullet journal converts” used a normal lined notebook he had in his desk and a ballpoint pen and he was HOOKED. Buttt, just in case you want to get fancy, here’s what I currently use, several years in:
JOURNAL: Leuchtturm 1917 Medium (A5), Dotted
This is the “standard” choice for hard-core bullet journalists. The size is perfect, the paper weight is thick enough for high-quality highlighters and marker pens, but not so thick that it gets clunky, and the dots are lovely for making spreads or even just very tidy lists. My second choice is a squared Moleskine, which has thicker paper if you want to do more colourful spreads/if you have a heavy hand.
PENS: Sharpie marker pens
These have been my pen of choice for almost everything for over a decade, but they’re a real “love ‘em or hate ‘em” pen. They work great if you write very carefully and up-and-down like I do, but they’re lousy if you write on an angle or very quickly (I don’t use them to take notes in a meeting, for example). In a bullet journal, though, they’re particularly gorgeous – dark black, legible, precise.
HIGHLIGHTERS: Zebra Mildliners
These are, again, the hard-core bullet journalist’s weapon of choice, but they’re not necessary if you’re starting out. My favourite highlighter in law school was the Staedtler Textsurfer (doesn’t bleed, nice even colour, great chisel), so I used those for quite a while as well. The advantage to Mildliners is that they come in a ton of beautiful colours, most of which aren’t neons, so you get a softer, prettier look from them.
RULERS: One short, clear, straight; one compass ruler.
Again, for the longest time I just used whatever ruler was in my desk drawer at work. But over time, I’ve switched to a short, clear ruler (like you find in a geometry set) and a compass ruler I found on Amazon (like this one, for making circles). I would recommend you get a ruler even if you’re going full minimalist.
TABS/FLAGS
I like to tab my bullet journal (to mark key pages), but most bullet journalists don’t – most people use an index at the beginning. I think this is a huge pain in the ass, so I usually buy a set of matching tabs with my new journal at the beginning of the year and go from there. Hot tip: Sharpie pens work great for marking up plastic tabs – no smudging if you let them dry a sec.
WASHI TAPE
Another “add-on” that some people will tell you is essential when it absolutely is not. Washi tape is a craft tape that comes in cute colours and patterns that is easily removable, so some bullet journalists love it to add to their spreads. I bought a three pack of matching washi tapes at Staples for my first bujo (I like all the Scotch Expressions ones – high quality, thick roll of tape) and still haven’t run out. I use it like tabs to mark the edges of important pages, which works really well. It’s also great for covering big errors (lol!).
EXTRAS
I also use a mechanical pencil, a big white eraser, and white-out tape, all of which are totally essential, IMO.

HOW TO SET UP A NEW BULLET JOURNAL
I debated how to write this section for a new bullet journalist, because there are so many different approaches for setting up a new one. Again, my advice is to keep it super simple the first time you try, because bullet journaling can get SO out of hand (and stop being functional). So here’s what I would recommend: either, follow Ryder Carroll’s method exactly (he has step-by-step instructions on his website), OR, just start with this week, and don’t bother with any of the crazy annual overview set-up pages. For most people who also keep a calendar on their computer/phone, it’s not necessary.
I’m in the second camp myself, and it’s how I got started. I’ve done the super intense annual set-up before (where you make pages for each month and overview calendars and rolling indexes… it gets intense), and you know what? I never used them. Once I was off and running making monthly pages and weekly spreads and useful lists, I never went back to those early pages. In fact, I totally forgot about them.
So after several years of trying different annual set-up methods, here’s what I’ve JUST put in the first pages of my new 2020 bullet journal (lots of the content is private/personal, so I’ve avoided a full photo spread, but I’ll pop a couple up on Instagram):
PAGE 1: A cover page I’ve drawn/lettered with my name and the year. I always feel weird putting something functional on page one, so I do this every year.
PAGE 2: Blank (it’s the back of the cover page, so I didn’t want any bleed under the pretty design I made).
PAGE 3: My “10 for 2020” – i.e., my 10 goals for the year. Under that I’ve written my 2020 theme (I do a one-sentence or one-word theme for each year, rather than a resolution), and in the little bit of extra space I’ve put a quote I like (side note: whenever I’ve got space left at the bottom of a page, I often fill it in with a quote or doodle – right then, or I leave it blank to populate later).
PAGE 4: My 10 “Personal Commandments” (a Gretchen Rubin exercise you can find here, which is similar to values-setting), and my “Big 3” for the year (I choose three focus areas per year, per month, per week, and ultimately, per day).
PAGE 5: My 2020 Reading List (I choose a reading theme or project each year. This year is to read 30 classic novels from Penguin’s Clothbound Classics collection, so I went through the list on the publisher’s website, and chose 30 I want to read. I’ll tick them off as I complete them here, and I’ll never think about what to read next.)
PAGES 6/7: 2020 Year-at-a-glance. I turned my journal sideways (so the two pages made a long page), made a box for each month, grouped into quarters of three-months each (a 3x4 grid of 12 boxes). For each quarter, I chose a focus area, and for each month I’ve chosen a theme (I only chose through the first half of the year, leaving the rest blank). Then I’ve made space for my three projects per month.
PAGE 8: January overview. I used to do a two-page monthly spread at the start of each month: one was a list of days so I could see major events at a glance, and one was a to-do list. This is a great way to start if you’re new. But, I’ve moved all calendar commitments to my online calendar and my to-do list to Asana (more on both in the next section), so this page includes a theme for the month (“Creating”), my three projects for the month, three things I’d like to accomplish at home, the three books I’ll be reading off my list, and any really important events or things I need to keep in mind this month (for example, major deadlines, if Ryan is away at all, if anyone is coming to visit, etc.). This page is meant to ground me for the month.
PAGE 9: Blank for now, and will likely be a random page I populate with quotes, doodles, ideas, etc. (I like to keep many of these throughout – they come up naturally when you need to make a two-page spread but are on the odd-numbered page at that moment). Embrace the single blank page and random fill-ins.
PAGE 10/11: My first weekly spread of the year, for Dec. 30-Jan. 5.
That’s it! I’m keeping it super simple and very spur-of-the-moment, which is how I like to bullet journal. If I decide to add a habit tracker (another very popular type of spread), I’ll just add one for the next few weeks from that date. If I need an overview of a month at a more granular level, I’ll add it then. If I want to switch weekly spread layouts (I do almost every week, depending on how I’m feeling and how busy I am), I will. I like to take it page by page and not obsess too much.
Which brings me to an important point: don’t be afraid to make mistakes! My bullet journal is FULL of white out, crossed out pages, and things that have been taped over. It is so scary to start a spread if you’re afraid you’re going to make mistakes or mess something up. Screw it. I cut pages out of mine all the time if I mess them up. Hell, I’ve made several mistakes in this one already (including writing that this week goes from “Jan. 30-Feb. 5”… I blame pregnancy brain). It doesn’t matter. The sooner you get over the fear of making permanent mistakes, the better your journal will be.

HOW I INTEGRATE MY BUJO WITH iCAL AND ASANA
As I mentioned up front, one of the reasons I started bullet journaling was because I was using Outlook at work, which felt very cold and not at all helpful in terms of planning, personal integration, and self-expression. Well, since then, I’ve tried different ways of meshing online programs with my bullet journal, especially now that I work for myself and have total control over what systems I use. I even tried being totally off digital methods at one point and went totally bullet journal, which I was shocked didn’t work well for me.
So, after MUCH experimentation, here’s what I’m doing now that I’m finding super effective:
CALENDAR: I’ll be honest, I have hardly any date/time-bound commitments anymore. Basically, I’ve got the occasional calls/meetings with my couple of freelance clients, social events, and obstetrician appointments. That’s it. So, I’ve got those in an iCal/Google calendar account, and Ryan and I sync our calendars to see one another’s. I also use an additional calendar in my iCal for reminders that isn’t synced with Ryan’s (it’s got project deadlines, reminders to buy birthday gifts that come up two weeks before each family member’s birthday, reminders to pay or check on bills, etc… things I need a time-bound reminder for).
ASANA: I use the free project management tool/website/app Asana for all my To Do items. I tried Asana early last year when I was starting my business, thinking it would be good to learn it now while I don’t have employees so that someday I can integrate other people into it. Well, I failed miserably using it the first time, and quickly shut down my account. Now, with tons and tons to get done before our baby is born in three months, I’m back on it, and I’m obsessed. I’ve broken out each major project I have right now (like “Baby Prep”, “Blog”, “Podcast”, and “House Refresh”), then put every single “to do” as individual items underneath. I’ve given each a date to do them on, then jigged them around in the calendar view until they were pretty well balanced. This might sound insane, but the sense of calm I felt when I was done… lordy lord, I can’t even tell you. If this sounds terrible to you and you’d rather stick to analog, I would recommend reading Getting Things Done and using his lists method – pretty much the analog equivalent. Get everything out of your head and into a system.
BUJO: Then, I use my bullet journal for “right away” planning and higher-level thinking. On Sundays, I review my previous week in both my journal and on Asana to see what remains undone. Then, I make my weekly spread in my bullet journal. In it, I put all my time-bound commitments from my calendar, and also note when Ryan has rehearsals and performances (we both work from home, so it’s helpful to know when he’s not here so I can, for example, work out in our basement, which is also his studio). Then, I write in my cleaning task for each day (I follow Clean Mama’s weekly cleaning routine, where you do one easy task every day, rather than clean all weekend). I also plan what kind of exercise I’ll do each day (including time-bound commitments, like classes). Finally, I make room for three to-do items each day (my “Daily Big Three”), and a daily log of water and meals (I do 6 tick boxes for each – 6 small meals, 6 refills of my water bottle). I also write my three major projects for the week (based on what I’m seeing in Asana), and three bigger things I’d like to get done at home (same). Done.
The trick is figuring out what the big things are in Asana, and how much time, energy, and attention I’ll need to get them done, then shuffling things around so I only have one or two major items per day and a few more minor items. I focus on the big things, then when I have extra time during my day, I go into Asana and punch out smaller things appearing in my to do list for that week – especially things that fall under that week’s big three projects.

I KNOW THAT SOUNDS LIKE A LOT…
… but the key is finding systems that work really, really well for you. My finance nerd friend with the Bic pen and the plain journal? He relied 100% on his Outlook for all his time-bound commitments, and his journal for 100% of his To Do items. Period. Home and work. I also know people who switched completely to their bullet journal because they loved having everything in one place. It really is about experimentation and your personal style of workflow management.
If a lot of the elements of bullet journaling appeal to you but you just can’t make the leap, my other suggestion is to try a Get To Work Book instead. I used one while I worked at the firm, and it was a great middle-ground between bullet journals and straight-up day planners (it was designed by a creative, for creatives). Or, go super minimalist on your bujo approach and see if it just makes you feel more organized – chances are, that level of oversight and influence over your commitments will get your creativity fired up.
And if you have questions, let me know! I absolutely love this system (as I’m sure you can tell), and since I’ve experimented a lot, I’ve seen it all. So let me know if you have any pain-points, stumbling blocks, or straight up questions I can help with. Email me here, or DM me on any socials.
YOU CAN DO IT!
Happy bullet journaling!